
 |
| This is your first clue, CHALK BOARD PAINT! |
 |
| And Here's your second clue! |
In one weekend, I reorganized our family schedule. At a glance, I can look at my wall and know who needs to be where, what time, and if they need to bring anything. Secondly, my husband can now on the same page with me! Because I love the results of painting magnetic paint and chalkboard paint on my wall, I also painted my pantry door and have my menu on the top. The bottom I leave open for the kids to get creative when I'm busy in the kitchen. This is a simple, easy, affordable and fun DIY to get organized.
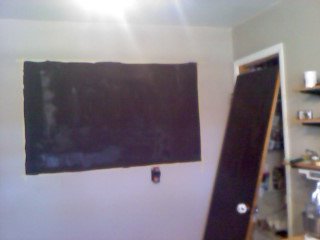 |
| Here's my kitchen wall. I used a yard stick to pencil a rectangle on my wall. Following the instructions, I painted the Magnetic paint on first. It's not as thick as paint, so keep a rag handy for runs. After the magnetic paint dried, I added the Chalk Board paint. It needs three coats with at least two hours drying time in between. |
 |
| My completed project. I have my schedule posted as Monday-Sunday and add appointments as needed. Need some more creative images to help plan your DIY Schedule? Take a look at the photos I pulled from Google for Chalkboard and Magnetic Paint!    |

So How Do You Do It?
- Look for a large area on your wall, living room, kitchen, office room.
- Use a yard stick and lightly pencil in the area you want to paint.
- After you've figured out the size of the area you want to use, clean the wall to be painted.
- Begin with the magnetic paint and follow the instructions on the back.
- Once the three different coats have completely dried, begin adding the chalk board paint.
- This too will need three different coats with at least two hours of dry time in between applications.
- Once the last coat of chalkboard paint has dried, the area needs to 'cure' for three days, per instructions of the paint.
- When the paint has cured, rub a thick coat of chalk all over the board and then wipe it down.
- Now you're ready to add your schedule, to-do list, and even your menu!
Ready For a Chalkboard but Not On Your Walls? Watch the news feed for Nebraska TV (Video)
- On NTV, I brought in an example of what you can do with a large piece of ply board.
- Find the size that you want, paint it according to the above instructions and then you will have a picture frame schedule that can be moved anywhere in the house!
Oh, One more thing I forgot to mention, the chalkboard comes in 20 different colors if you aren't a fan of the black!
ReplyDeleteFeel free to share your ideas of how you keep your schedule organized too, would love to hear from you!